Upgrading Your DCP's Firmware
Checking for Available Updates on the Gen-16 Server
Connect your DCP to your computer with a USB cable. Ensure that it is on (not in Standby) and that your computer has an internet connection.
Launch the DCP Access Tool. If the "Check for updates on launch" preference is set (it is set by default) the program will check the Gen-16 server for updates and notify you if any are available.
If you launched the DCP Access Tool before you connected your DCP, you can check for updates manually by selecting "Check for updates" from the Help menu.
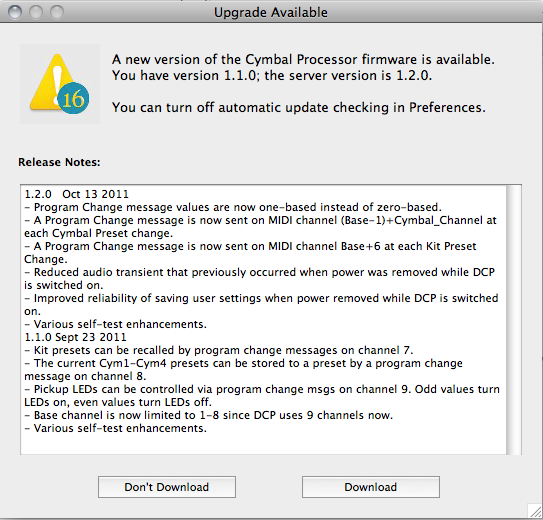
If an update is available, the program will present you with a dialog describing the update and offering you the opportunity of downloading the update:
We recommend you read the Release Notes carefully as they may contain important information regarding the applicability of the upgrade to your DCP. If you choose to download the update, it will open automatically in a Firmware Upgrade window.
Loading an Upgrade File Manually
Under certain circumstances you might obtain an upgrader file by other means than from the Gen-16 auto-update server; Gen-16 tech support might supply you with a special upgrader, for example. In that case simply open the file via the File menu or other means and it will load itself into a Firmware Upgrade window.
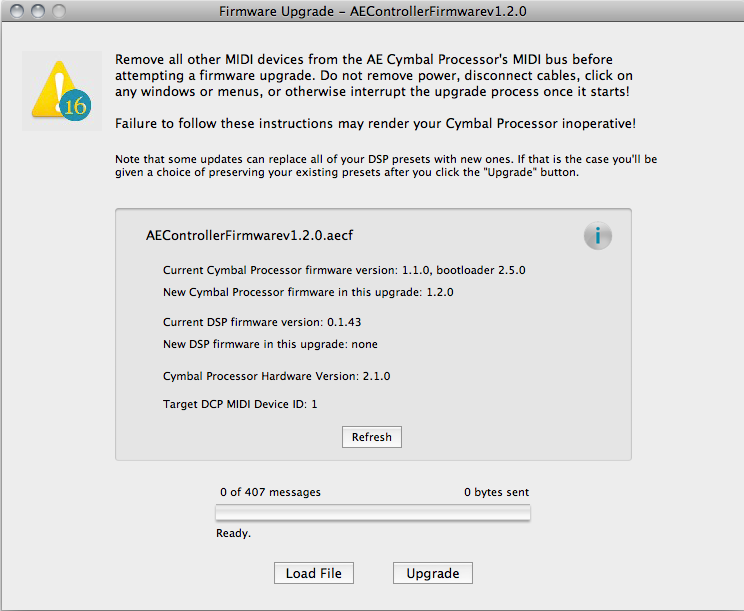
Click here to see images of the Firmware Upgrade window and for an explanation of all of its controls and displays.
Performing an Upgrade
To perform an upgrade, first ensure that there are no other MIDI devices on the AE Cymbal Processor's MIDI bus. Then click the "Upgrade" button in the FIrmware Upgrade window.
Preserving Your Existing Presets Across Upgrades
If the upgrade file contains Cymbal, Reverb, or Kit presets that will overwrite the presets already in your DCP, you will be presented with a dialog advising you of that fact and giving you several options for saving and/or restoring your existing presets:
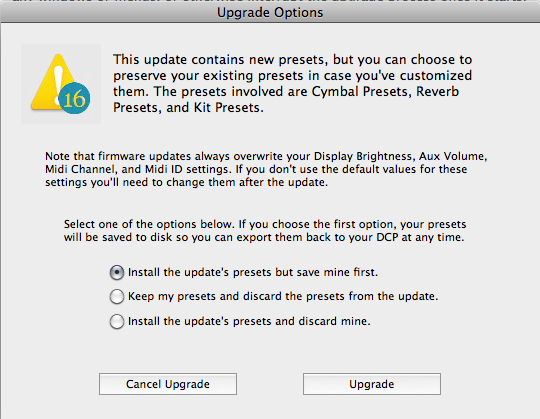
Typically any cymbal or reverb presets issued in a firmware update will be either the same as those already in your DCP or improvements to them. The Kit presets in a firmware update will always be set to default values. This is unavoidable since any Kit Presets you created for your another set of cymbal presets wouldn't apply to a new set of cymbal presets. On the other hand, if the update's cymbal presets are the same as those you already have, you might want to preserve any kit presets you've created. The Upgrade Options dialog window gives you choices to cover most scenarios.
If you select the first option, "Install the update's presets but save mine first", you'll be given a chance to save your presets to disc before the upgrade overwrites them. The update will install its presets so you can try them out, but if you later want to restore your previous set you can export it back to your DCP at any time.
If you select the second option, "Keep my presets and discard the presets from the update", Your presets will be imported prior to the update's installation, then automatically exported back to your DCP after the update has been completed. After the update process has finished you'll be given an opportunity to save the updater file (see below) so you can install the update's presets any time you want by updating from the saved file.
If you select the third option, "Install the update's presets and discard mine", that's exactly what will happen - your existing presets will be overwritten by those in the update and you will not be able to restore them later.
Once you've confirmed your choice and clicked the "Upgrade" button, your DCP's numeric displays will go dark and the "Z" logo will flash rapidly, indicating that the upgrading process is in progress.
NOTE: If you selected the first or second options, the first step in the update process will be to automatically import your presets from the DCP so that they can be saved to disc and restored later. You won't be asked for a filename and location to save your presets to until this step has completed, so don't panic, your presets are not being overwritten yet!
Once you click the Upgrade button, do not click on any windows or menus, remove power, disconnect cables, or otherwise interrupt the upgrade process until it is complete! Failure to follow these instructions may render your Cymbal Processor inoperative!
If for some reason the upgrade fails, the DCP's numeric displays may remain dark, with the "Z" logo flashing slowly. The "Upgrade" button's caption on the Firmware Upgrade window will change to "Retry". Click "Retry" to try the upgrade process again.
After a successful upgrade, your DCP will restart automatically and a confirmation dialog box will summarize the results. You can then check your DCP's new firmware version(s) by clicking the "Refresh" button on the Firmware Upgrade window.
Saving Upgrade Files
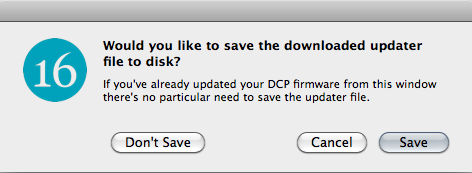
When you close a Firmware Updater window that has a downloaded upgrader file loaded, you're given the option of saving the upgrader file. Normally there is no need to do this, but the feature is provided in case you want to save the firmware version for possible future downgrading, since the Gen-16 server generally does not make obsolete firmware versions available for download.
Upgrading The DCP Access Tool Application
The DCP Access Tool will also check for updates to itself on the Gen-16 server. If a newer version is found it will offer you the opportunity to download the newer version. The dmg or ZIP file, depending on your platform, will be downloaded by default to your Downloads folder (Mac) or your desktop (Windows), but you will be offered a choice of selecting a different download location. You will need to quit the program and manually decompress and copy the newly-downloaded version per the Installation instructions.
See also: Firmware Upgrade Window